12/4/16

{ How To Make Cuban Coffee }


While back home in Miami this past summer, I had one of the most exciting opportunities that I FINALLY get to share with you all! Thanks to my awesome friends who did a solid job at hyping up my little blog (lookin' at you Talia and Jake,) I met Jackie -- the powerhouse behind the Little Havana Visitors Center in (you guessed it) Little Havana. Together, we dreamed up the video above to play in Jackie's store and show tourists how to properly prepare a Cuban Espresso and a Cortadito from home! SO FUN!!!

I had such a blast shooting this video in the heart of Little Havana - and that's all thanks to the stellar gals I got to shoot it with! Firstly, the incredible stylist Mileidy, who has such a skilled eye for style and owns every vintage prop your heart could desire. She lent us her home, her time, and her expertise which I still cannot thank her enough for!! And of course, my BFF Talia (the video's coffee making extraordinaire,) who patiently helped every step of the way (and lent us her pretty face, too!)

Find the two recipes featured in this video below - and be sure to stop by the Little Havana Visitors Center next time you're in MIA!!! 


Cuban Espresso  //  Cortadito


 INGREDIENTS 

For the Cuban Espresso...
Water
Ground espresso
2 - 4 tablespoons sugar

For the Cortadito...
Cuban Espresso
Evaporated milk,  frothed 


DIRECTIONS


1. To begin, fill the bottom half of a traditional Cuban coffee maker with water. Do not fill past the valve! Top with the coffee filter and fill it with ground espresso. (During this step you can pack the grounds tightly if you'd like a stronger brew.) Level off the grounds with the back of a spoon and tightly twist on the top half of the coffee maker.

2. Over medium heat, begin to brew the espresso with the lid of the coffee maker lifted UP. Once the first first few drops are released, take a bit of the espresso and pour it into a bowl with a few tablespoons of sugar. (Use more or less sugar depending on your personal taste!) Quickly close up the lid of the coffee maker and continue to brew the espresso until it's done, (about 3 minutes.) 

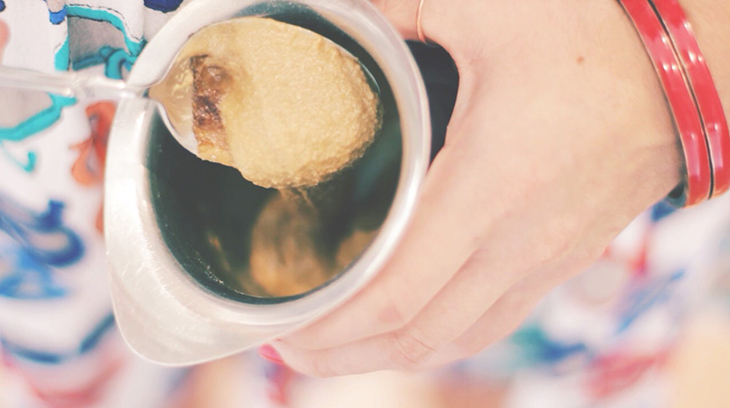
3. As the espresso finishes brewing, take the sugar and espresso mixture into your hands and whip  it together vigorously. After a couple minutes, it will become a thick, pale brown paste that should flow slowly off your spoon, like lava.

4. When the espresso is brewed, carefully pour it over this thick sugar paste and stir until a sweet foam, known as "espumita," rises up to the top. You can serve the Cuban Espresso in small cups, or use it to make a Cortadito!

5. To make a Cortadito, simply mix equal parts Cuban Espresso and canned evaporated milk. Warm and froth the evaporated milk, pour it into the espresso, top with foam, and drink up!


enjoy!


9/1/16

{ Three Ways to Jazz Up Ice Cream Cones! }


Today I am SO excited to announce that, along with baking up a few yummy treats for Studio DIY, I've also begun shooting and editing their very first food videos!!! HOORAY! 

We're sharing our first of many: three awesome and unique ways to jazz up store-bought waffle cones - with a Baked Alaska cone, a Rainbow Drumstick, and a Circus Animal Cookie cone! All equally delicious and equally fun to look at. :)


Don't miss the video above for a quick little tutorial on how to make each cone!!!


For the full recipes + instructions, be sure to check out Kelly's post on Studio DIY! Stay tuned for plenty more fun, bright, and colorful food videos in the near future!!!


    Photography by the talented Jeff Mindell
    Cinematography by yours truly. :)


7/13/16

{ Sweet Red Cherry Pavlovas }


I am so, so, so excited about this post today. Firstly, because it's been waaay too long since I last shared a recipe video on here! And secondly, because these pavlovas are the stuff dreams are made of. (Ok, dramatic...but just LOOK at them!)

Light & crisp meringue nests with marshmallowy centers, dolloped with freshly whipped cream and drizzled with a sweet pink syrup made of fresh, juicy cherries. 

The most stunning summertime dessert,  just a scroll away!


Sweet Red Cherry Pavlovas


Yields 6 small pavlovas.

~ INGREDIENTS ~

For the meringue nests...
2 large egg whites
a pinch of salt
1/2 cup sugar
1/2 teaspoon vanilla extract
1 teaspoon corn starch
1/2 teaspoon lemon juice

For the pink cherry syrup...
1 cup fresh cherries, pitted
2 tablespoons lemon juice
1/2 cup sugar
1 tablespoon heavy whipping cream

For the topping...
Unsweetened fresh whipped cream 
Fresh sweet red cherries, with stems
Powdered sugar (optional)


DIRECTIONS

1. Begin by making the meringue nests. Preheat your oven to 350 F. In a large bowl, whisk together the egg whites and salt. Once the mixture is frothy, slowly stream in the granulated sugar. Once the mixture is opaque white and fluffy, add in the vanilla extract, corn starch, and lemon juice. Beat until shiny, stiff peaks form, (see video for reference.)

2. Next, scoop the meringue mixture onto a parchment lined baking sheet. Form a small indentation in each of the scoops to create a "nest" for the whipped cream. Place the meringues into the 350 F oven, and immediately turn the oven temperature down to 300 F. Bake the meringues at 300 F for 25 minutes, watching carefully within the last 5 minutes to avoid any browning. When 25 minutes is up, turn off the oven and leave the meringues inside for another 25 minutes to dry out and finish cooking. Lastly, remove them from the oven and let them cool.

3. While the meringues bake, make the pink cherry syrup. Combine fresh pitted cherries, lemon juice, and sugar in a small saucepan. Bring the mixture to a boil (stirring constantly to avoid burning of the sugar,) reduce the heat, and simmer for approximately 10 minutes - or until the liquid has thickened into a syrup.

4. Strain the fresh cherries out of the syrup, and set them aside to top the pavlovas later. Once the  strained cherry syrup mixture has cooled completely, stir in a touch of cream until the syrup becomes an intense pink color.

5. Once the meringues have cooled and the syrup is ready, whip unsweetened fresh cream (the meringues and syrup are sweet enough on their own.) To assemble the pavlovas, place one meringue nest on a plate (preferably the plate you'll be serving on, as the pavlovas become delicate once assembled,) top with a generous dollop of whipped cream, drizzle with the pink cherry syrup, and spoon on the cooked cherries that you set aside earlier. If desired place a fresh red cherry on top and dust with powdered sugar. The pavlovas are best enjoyed immediately! :)


enjoy!

7/12/16

{ Linn's Olallieberry Pie }


Today's post is all about my recent trip along the coast of California!

As a few of you may already know, I just graduated from UCLA (which was incredible, yet also mildly terrifying.) During the weeks surrounding and following graduation, my family (aunts, uncles, cousin, grandma, grandpa, mom AND dad) all flew out from the East Coast to celebrate with me. I'm a lucky gal!

We had the BEST time exploring LA, San Diego, and Las Vegas. But the most unique part of our journey was a brief road trip up the Pacific Coast Highway, with my grandma, grandpa, and mom. Along the way, we made stops at the famous Hearst Castle in San Simeon, discovered the magical "olallieberry" (which makes, quite possibly, the world's best pie,) drove on stomach-churning hairpin turns in Big Sur (with views that made it SO worthwhile,) brunched in the beautiful city of Carmel, and wandered through the mesmerizing Monterey Bay Aquarium. Long story short, it was FUN!

Brace yourselves for a photo-heavy post with some of my favorite memories from the adventure, along with a little video I edited together from the aquarium and a photo shoot with a mini olallieberry pie from Linn's bakery in Cambria, CA! 


(OH, and here's me, post-graduation, lookin' cray. PEACE OUT SCHOOL!)

Below are a few snaps taken at our first stop of the trip: the historic Hearst Castle. The castle sits up on a hill with breathtaking views and is home to wild zebras! ZEBRAS!!!


The swimming pool. CASUAL.


Big Sur, you are a sight for sore eyes!


A little video I shot while at the Monterey Bay Aquarium. That place is incredible inside AND out... it's right on the water, and the views are spectacular!


A little flapjack octopus!!! Love him!


A scenic drive through the coastal city of Carmel by the Sea. (above)

My grandma and grandpa's first look at the ginormous redwood trees! (below)
(This photo only shows like, a third, of the tree. They're HUGE.)


And last but not least, our THIRD stop at Linn's while on the trip. Great service, great food, GREAT olallieberry pie!


Hope you enjoyed my recap of our Coastal California trip! Have you been to any of these destinations or tried a slice of olallieberry pie before?! (We hadn't even heard of an "olallieberry" before this trip... ya learn something new everyday!)


See ya soon!
- Rachel


7/4/16

{ S'mores Brownie Pie }


Happy Fourth of July!!!!!!

Let's celebrate this beautiful country with, quite possibly, the most American combination of desserts: BROWNIE + PIE + S'MORES!! Like, can it get more patriotic than that?

This glorious pie has a crisp, buttery graham cracker crust, gooey brownie center, and toasted marshmallow meringue topping. OH, and if you aren't already drooling, the brownie center is stuffed with melty chunks of Hershey's milk chocolate, (because a s'more just isn't a s'more without Hershey's... don't you agree?!)

My friends and I had such a blast making (and eating) this S'mores Brownie Pie this holiday weekend, and we hope you do too!! Be sure to scroll down for additional photos and the recipe. :)


S'mores Brownie Pie


~ INGREDIENTS ~


For the graham cracker crust...
1 1/2 cups of honey graham cracker crumbs
5 tablespoons melted butter
2 tablespoons brown sugar
a pinch of salt
a dash of cinnamon (optional)

For the fudgy brownie filling...
1/2 cup + 3 tablespoons boiling water
1/3 cup unsweetened cocoa powder
1/2 cup semi-sweet chocolate
1/2 stick (4 tablespoons) of butter, melted
1/2 cup vegetable oil
2 large eggs
2 egg yolks
2 teaspoons vanilla extract
1 cup white sugar
1 cup brown sugar
1 3/4 cups all-purpose flour
3/4 teaspoon of salt
1 Hershey's milk chocolate bar, chopped

(This brownie recipe yields more batter than needed for the pie, so feel free to bake up mini pies or a small pan of brownies with the leftover batter!)

For the toasted marshmallow meringue topping...
4 egg whites
1/2 teaspoon cream of tartar 
1/4 cup sugar
Red, white, & blue sprinkles, for garnish


DIRECTIONS

1. Start by making the graham cracker crust. Pulse graham crackers in a food processor until they become small crumbs that resemble sand. To the crumbs, stir in butter, brown sugar, salt, and cinnamon. Press and pack the mixture tightly into the bottom, and up onto the sides, of a pie tin.

2. Next, make the brownie filling. Bring water to a boil in the microwave (in a large, microwave-safe bowl.) Once hot, whisk in the cocoa powder and semi-sweet chocolate until melted. Then, add melted butter and oil. Let the mixture cool for a minute, and then quickly whisk in the eggs and egg yolks. Next, add the vanilla extract and sugars, and whisk until smooth. Lastly, fold in the flour and salt until just combined (do not over mix!)

3. Break apart a bar of Hershey's milk chocolate and place it into one even layer on top of the graham cracker crust. Then, cover with the brownie batter and fill the pie tin until just nearly full. Bake for 35 - 40 minutes. Check that a toothpick comes out clean from the center of the pie before removing it from the oven to cool.

4. While the s'mores brownie pie is cooling, start on the meringue topping by whipping together egg whites and the cream of tartar. Slowly add in the sugar until egg whites are firm, opaque, and glossy white. 

5. Place the meringue into a piping bag fitted with a large round tip, and pipe small peaks in a circular pattern on top of the brownie pie, (or for a more "rustic" look, dollop the meringue all over the pie and create peaks with a spoon.) Broil the meringue in the oven for 30 seconds to a minute, watching carefully (as it will toast up and begin to burn rather quickly.)

6. Once the meringue is toasted, top the pie with patriotic sprinkles, slice up, and enjoy immediately! And have a happy Fourth of July!!!


enjoy!

2/12/16

{ Edible Dark Chocolate Mousse Cups }


In search of a super last-minute yet SUPER impressive Valentine's Day dessert? You're in luck. 

These edible dark chocolate cups filled with fluffy, chocolatey mousse are so elegant (and look a lot more complicated than they are.) Watch the video above for a quick step-by-step, and scroll to the bottom of the post for the full recipe.

Oh, and Happy Valentine's Day!!

Edible Dark Chocolate Mousse Cups

Yields 4 cups.

~ INGREDIENTS ~


For the chocolate bowls...
12 ounces dark chocolate 
water balloons

For the chocolate mousse...
3 ounces cream cheese, room temperature
2 tablespoons butter, room temperature
3/4 cup powdered sugar
1/4 cup cocoa powder
1 tablespoon milk
1 teaspoon vanilla extract
1 cup cold heavy whipping cream

fresh raspberries & mint, for garnish


DIRECTIONS

1. Melt the dark chocolate. Set aside and allow to cool to room temperature. Meanwhile, blow up the water balloons. Rinse them off, dry them, and dab each with a bit of coconut oil (or nonstick spray) on a paper towel. This will help to keep the balloon from sticking to the chocolate.
(*note: the mousse fills 4 chocolate bowls. However, I made a few extra bowls with the leftover chocolate. Store them in the freezer for later, and fill with ice cream!)

2. Once the chocolate has cooled, dip each balloon halfway into the chocolate. Coat well, and place onto a parchment lined baking sheet dabbed with dark chocolate (to act as the "base" of the bowl.) Pop them into the freezer immediately. Freeze for about 15 minutes, until the chocolate is set. Once set, pop the balloons with a needle and remove from the chocolate. Return to the freezer.

3. Next, make the mouse. In a mixing bowl, whip the cream cheese and butter. Once fluffy, add in the powdered sugar, cocoa powder, milk, and vanilla. Whip for another minute, until combined.

4. Whip the cold heavy cream in a separate bowl. Once stiff peaks form, carefully fold the whipped cream into the chocolate cream cheese mixture. Once thoroughly incorporated, place into a piping bag with a star tip and pipe the mousse into the edible chocolate bowls.

5. Garnish with fresh raspberries and sprigs of mint if desired. Serve immediately and enjoy!


(Recipe adapted via Nugget Markets.)


~~~~


2/10/16

{Healthy Chocolate Date Truffles}


Popping in with an incredibly simple, sweet, and (omg) healthy Valentine's Day treat?!

Let me start by saying that I am not the biggest fan of so-called "healthy" desserts. Dessert is meant to be sweet and indulgent and rich - and the few healthier desserts that I've made always end up lacking in at least one of those key characteristics (usually in the "sweet" arena.)

HOWEVER, (clearly... or I wouldn't be posting this recipe,) these Healthy Chocolate Date Truffles check each of the three boxes. Naturally sweet from the dates, rich from the coconut oil, and indulgent from the cocoa powder. Oddly enough, they end up tasting almost like a fudgy brownie bite... not even kidding.

These faux truffles are inspired by my cousin, Courtney (u da best!,) who made them alongside a plethora of delicious Christmas cookies a couple months back. I found myself going after these truffles more than the REAL cookies (I know, crazy.) 

Just more proof that this healthy dessert is worthy of your attention.


Healthy Chocolate Date Truffles

Yields 10 truffles.

~ INGREDIENTS ~


10 medjool dates, pitted
1 tablespoon coconut oil
1 heaping teaspoon cocoa powder
a splash of vanilla extract
a pinch of salt

cocoa powder, sprinkles, mini chocolate chips 
& shredded coconut, for coating


DIRECTIONS

1. Place pitted dates into a high-powered food processor. Blend until chopped up finely.

2. Next, add in coconut oil, cocoa powder, vanilla extract, and pinch of salt. Continue blending (for about 2 minutes) until the mixture is completely smooth.

3. Scoop small amounts of the mixture into your hands and roll to form a ball. 

4. Coat in your desired topping - cocoa powder to be more traditional, and sprinkles if we're havin' fun!

5. Share with your Valentine, enjoy!


~~~~